Power Automate is a powerful tool from Microsoft that allows you to automate repetitive tasks and processes, but it’s not always easy to figure out why a workflow is failing. There are many different reasons a workflow could fail, and most of them have to do with the logic inside of the workflow itself. We’ll save that for later blog posts but in this blog post, we will walk through the overall process of debugging a Power Automate workflow.
Step 1: Check the Run History
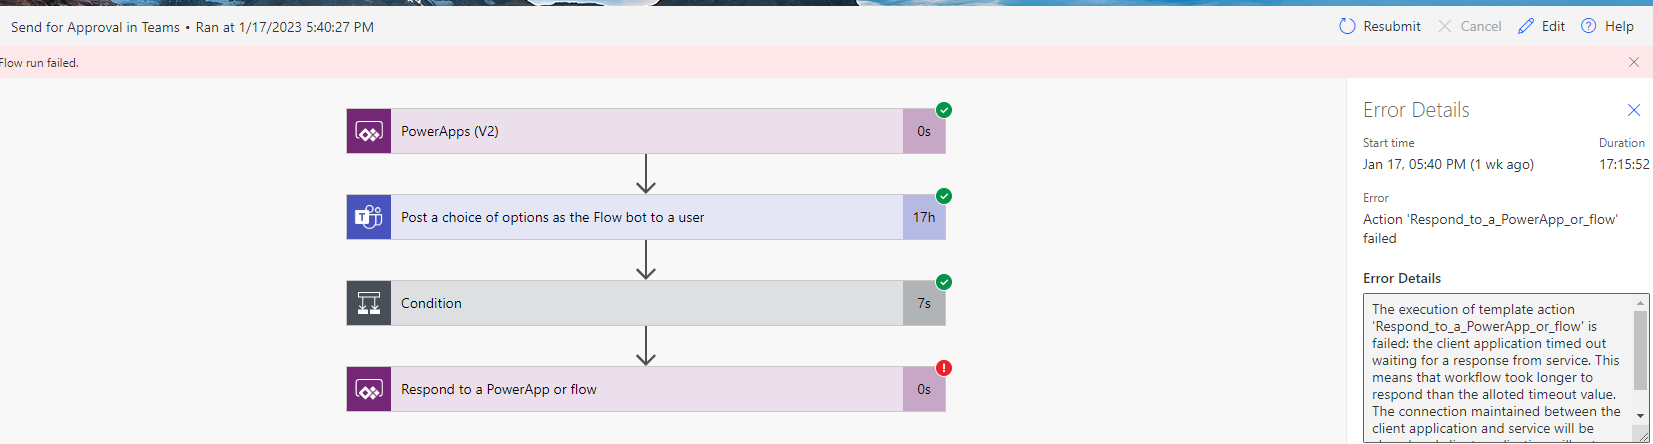
The first step in troubleshooting a failing Power Automate workflow is to check the Run History. This will give you a detailed view of when the workflow was run, the status of the run, and any error messages that were generated.

To view the Run History, go to the Power Automate portal and select the workflow that is failing. Then, click on the “Runs” tab. This will show you a list of all the runs for the workflow, including any errors that occurred. You can then click inside each of the workflows to identify the particular failure cause for an individual workflow run. An error box will pop up on the right displaying the error message
Step 2: Identify the Error
Once you have identified the error, take a look at the error message referenced above. The error message will provide information about the specific problem that is causing the workflow to fail. For example, it might indicate that a particular connector or action is not working properly.
Common errors can include:
- Data type conversion errors – EX: Power Automate fails to convert an int to a string
- Null errors – EX: Power Automate can’t take action on an item because there is a null value it isn’t expecting
Power Automate provides the Power Automate Checker to validate your flows against best practices and performance standards. This can help you to ensure that your flows are of high quality and perform well.
If you are using Power Automate Desktop, one recommended solution is to use the Power Automate Debugger to troubleshoot and debug your flows. Power Automate Debugger is a tool that allows you to set breakpoints, view variables, and step through your flow’s code to identify and fix issues.
Step 3: Determine the Cause of the Error
Just because you’ve identified the error doesn’t necessarily mean you know what caused it. The next step, of course, is to determine the cause of the error. This might involve reviewing the configuration of the connector or action that is causing the problem, or checking for any updates or changes that might have affected the workflow.
A suggestion would be to try and trace the cause of the error back through the workflow. An example would be that if your workflow ran into a null value when it was expecting a string, should the string be there? Should the string have been set earlier in the workflow? If so, why didn’t it?
Step 4: Implement the Fix
Once you have identified the cause of the error, it’s time to implement a fix. This might involve updating the configuration of the connector or action, or making changes to the logic of the workflow. One of the pitfalls to avoid here would be implementing a fix that makes maintenance of the workflow more difficult. It can be easy if there are bugs in a key workflow to implement the easiest possible workaround just to save time, this can cause many headaches down the line. Take the time to fix the issue properly.
Step 5: Test the Fix
Once you have implemented the fix, it’s important to test the workflow to ensure that it is working properly. This might involve re-running the run of the workflow that failed to make sure that it passed, and any others that might have failed as well. Remember to delete any test data that was generated during this step.
Step 6: Monitor the Workflow
Finally, it’s important to monitor the workflow to ensure that it continues to run without any issues. This usually just involves setting up alerts or notifications to notify you if the workflow fails again. Otherwise you can periodically check that workflows home page to monitor the runs.
To wrap it up, troubleshooting a failing Power Automate workflow can be a complex process but these steps make an easy overall process to follow. Remember that it is important to keep an eye on your workflows and be pro-active to avoid errors and performance issues. With the right approach, you can ensure that your workflows are running smoothly and your business is running efficiently. If you or your company needs any help, reach out to Kumo Partners for assistance!


0 Comments