Introduction
We have implemented a video tutorial that revamps the content in this blog post and uses more modern patterns that are available in 2021. View the updated tutorial here: PowerApps Tutorial: Issue Tracker – Comment History
Hello and welcome to the first in the PowerApps Tips & Tricks Series! We have been working with PowerApps since the initial Beta Release in 2016 and have seen a lot of good and bad practices that have come about as the platform has grown. In this series, we plan to provide quick, easy to digest examples and instructions on how to implement the good ones and what to look out for as you work with the PowerApps Platform.
Tip #1 – Display a dynamic History Log in PowerApps
The first tip of the series will be centered around a very common request we get from our partners, how can I see a list item’s version history in PowerApps? Being able to provide this kind of information can be very useful for a wide-array of use-cases to present a running track of what’s happened to a given request. Some examples we come across consistently include:
- approval processes that require back and forth with the requester and approvers
- Updates that occur and are tracked throughout a process for reporting KPIs
- detailed history related to other changes that may have occurred to a given request that requires auditability.
With some of the older approaches to doing this in SharePoint, one might use the multi-line field of text’s append text functionality that could track updates made to an item. At this point in time, there is not an out-of-the-box (OOTB) way to access a multi-line field that has the append feature enabled, however there is this idea under review as of October 2019)
How We Create The Dynamic History Log
Even though we cannot use the append feature we have been able to create a fully functioning alternative that provides more features and a cleaner design. We achieve this by utilizing the multi-line field and taking some tricks from our web developer background to utilize HTML and CSS to create a well functioning and modern looking history log.
In the demo below, I’ll be showing you how to:
- Create a simple list to store our data in SharePoint
- Configure a PowerApp to Connect to that List
- Create a working History Log that can track changes to a given List Item
- Test and Compare (download the app package below)
Step 1 – Provision the List
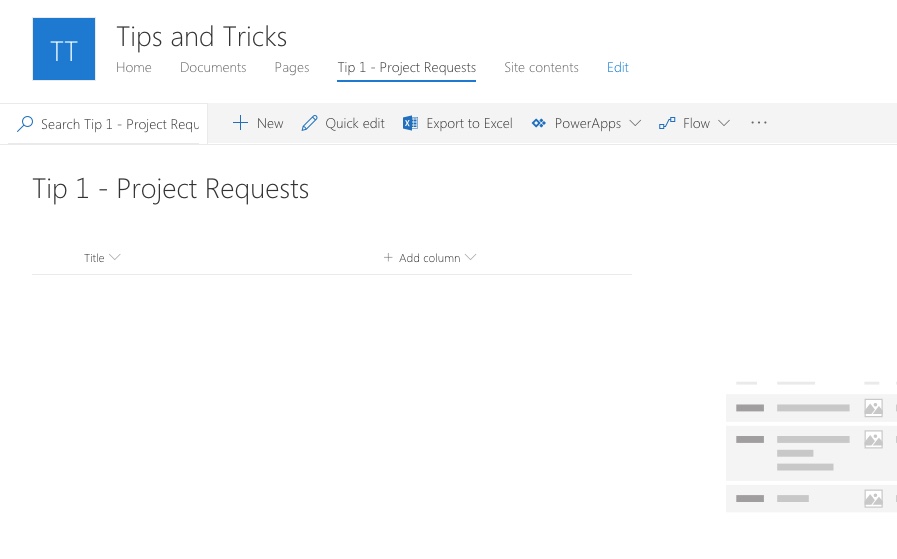
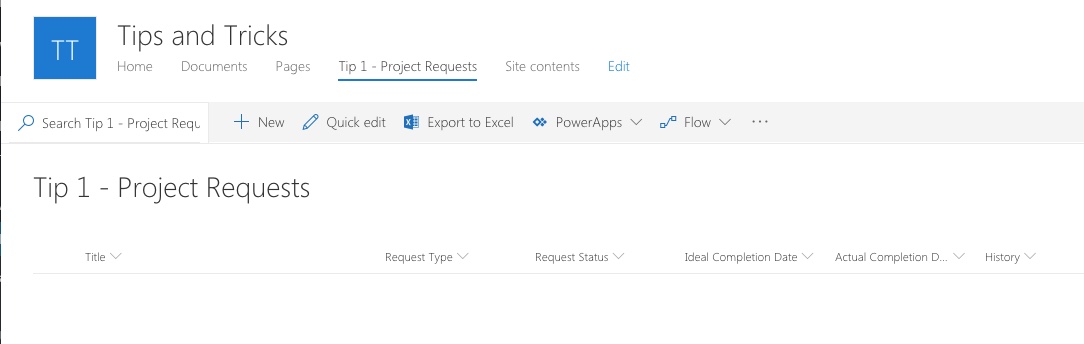
The first thing we will need to do is provision a list on SharePoint that can store our data. I’m using a Team Site and created a new list called “Tip 1 – Project Requests”. Feel free to calls yours whatever you like and just replace it wherever you see me refer to it as we go along. We’ll initialize on our list the following columns:
| Field Name | Field Type |
| Title | No Changes |
| Request Type | Choice Column
|
| Request Status | Choice Column
|
| Ideal Completion Date | Date Field (no time) |
| Actual Completion Date | Date Field (no time) |
| History | Multi-line field of Text Leave as plain-text and NOT rich text |
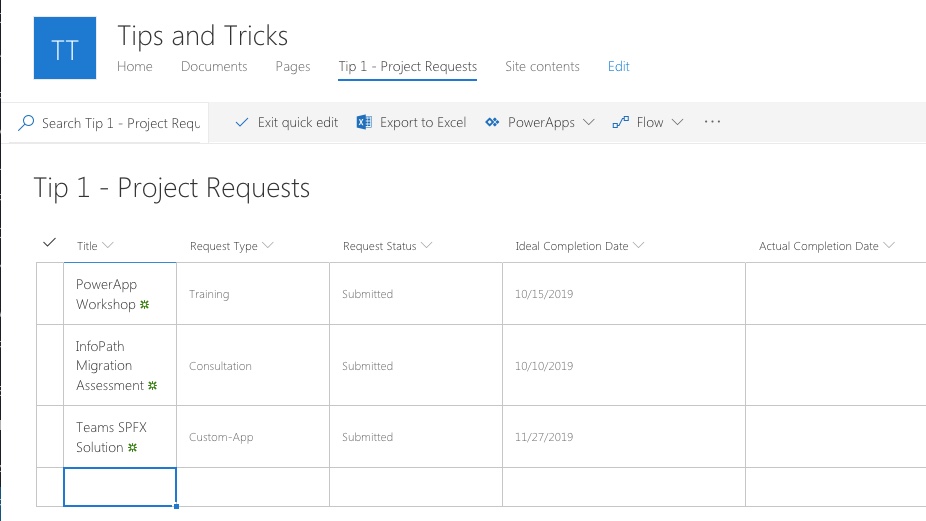
For the sake of trying to keep this first article more concise, let’s populate the list data via the Quick Edit view so that we have some pseudo data to work with:
| Title | Request Type | Request Status | Ideal Completion Date |
| PowerApp Workshop | Training | Submitted | 10/15/2019 |
| InfoPath Migration Assessment | Consultation | Submitted | 10/10/2019 |
| Teams SPFX Solution | Custom-App | Submitted | 11/27/2019 |
Step 2 – Initial PowerApp Setup
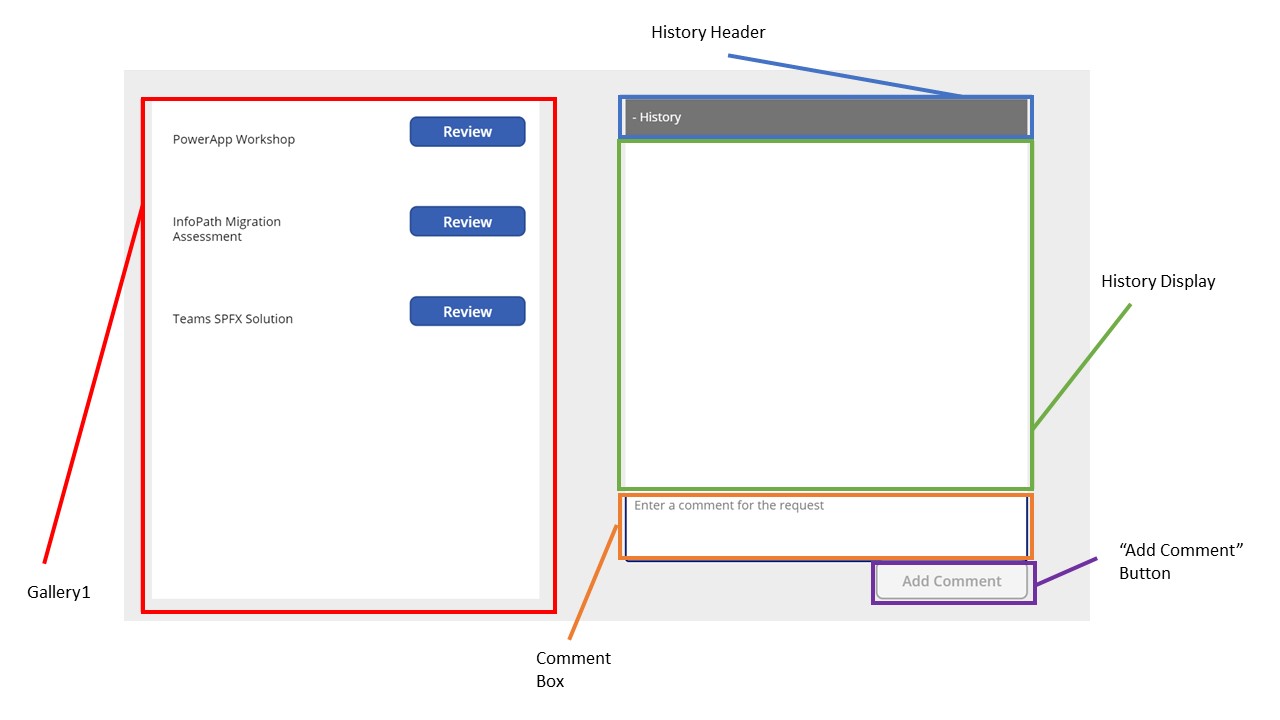
Now that the list is created, let’s provision a new tablet layout PowerApp. This PowerApp will be a single screen and in order to provide a running POC will have a handful of components that are outlined in the screenshot below.
- First click on View tab > Data Sources and select or create a new SharePoint connection.
- Once selected, search for the SharePoint site that you created the list on click “Connect”
- You should then see the lists for that site, including the one you created. Select it and click “Connect”.

- Once connected, you should then see the list in the Data Sources Panel (note some of the screens may look different in time as Microsoft continues to enhance the Editor’s UI including verbiage / side / etc.)

Now we can start to make the necessary changes we need:
- Screen1 (select through the tree view on the left-hand side)
- Fill:
RGBA(237, 237, 237, 1)
- Fill:
- Request Gallery Components (Gallery1)
- Gallery > Blank Gallery
- Data Source: ‘
Tip 1 - Project Requests’ - Fill:
RGBA(255,255,255,1)
- Data Source: ‘
- Add a Label into the gallery (select the Gallery, then Insert > Label).
- Text:
ThisItem.Title
- Text:
- Add a Button into the gallery (select the Gallery, then Insert > Button).
- Text: “Review”
- OnSelect:
- Gallery > Blank Gallery
Select(Parent);
Set(selectedRequest,ThisItem);
// Creates a global variable with the selected request’s data
UpdateContext({resetCommentBox:false})
// Sets a context variable that resets the comment box when set to true
Step 3 – Request Review Component (History)
Now that we have some project requests appearing we can begin to focus on the History log functionality. In order to create the effect of a running history, we will be using HTML to drive a formatted list of past changes.
- History Header
- Insert > Label
NOTE: Make sure you don’t have the gallery selected anymore- Fill:
RGBA(116, 116, 116, 1) - Text:
selectedRequest.Title&" - History" - General Dimensions:
- Width: 550px
- Height: 50px
- Fill:
- Insert > Label
- History Display (this is what displays the HTML content stored in the multi-line field of text we created)
- Insert > Text > HtmlText
- HtmlText:
selectedRequest.History - Fill:
RGBA(255,255,255,1) - General Dimensions:
- Width: 550px
- Height: 500px
- HtmlText:
- Insert > Text > HtmlText
- Comment Box
- Insert > Text > Text Input
- Mode: Multiline
- Default: “”
- HintText: “Enter a comment for the request”
- Reset:
resetCommentBox - General Dimensions:
- Width: 550px
- Height: 100px
- Insert > Text > Text Input
- “Add Comment” Button
- Insert > Button
- Text:”Add Comment”
- DisplayMode:
If(Not(IsBlank(selectedRequest)),DisplayMode.Edit,DisplayMode.Disabled)- This makes sure that the user has selected a request before we can submit a comment
- OnSelect:
- Insert > Button
Patch(
    'Tip 1 - Project Requests',
    LookUp('Tip 1 - Project Requests',ID= selectedRequest.ID),
    {
        History: Concatenate(
            "<p style='margin:0;'><b>(" & Now() & ") - " & User().FullName & ":</b></p>",
            " <p style='margin:0;padding-left:30px;'>" & TextInput1.Text & "</p>",
            "<hr>",
            LookUp('Tip 1 - Project Requests',ID= selectedRequest.ID).History
        )
    }
);
Notify(
    "Comment posted to the issue",
    NotificationType.Information
);
Set(selectedRequest,LookUp('Tip 1 - Project Requests',ID= selectedRequest.ID));
UpdateContext({resetCommentBox: true})
Let’s Dive into what’s going in the OnSelect function
Patch()- The patch function helps us reduce the overhead of using a Form component by simply updating only the property we provide it (see specs). It takes the three arguments of:
- Data Source (SharePoint list)
- Record (expects a “Record” value. We can retrieve this by using the LookUp function (see specs) since this will return a single Record (in this case list item) that matches a criteria. That criteria is where the Item ID is equal to our global variable selectedRequest.ID
- Update (which has the notation
{fieldName:”value”}
- The patch function helps us reduce the overhead of using a Form component by simply updating only the property we provide it (see specs). It takes the three arguments of:
- In the Patch, we update the History field with the below Concatenate() function, which is where we do the dynamic HTML markup that is data bound to controls that are in the PowerApp (TextInput1 represents the Comment Box):
Concatenate(
"<p style='margin:0;'><b>(" & Now() & ") - " & User().FullName & ":</b></p>",
// Creates a header formatted block with the time and user name
" <p style='margin:0;padding-left:30px;'>" & TextInput1.Text & "</p>",
// Binds the comment box value into the next line as a bullet"
<hr>",
// Adds a horizontal bar to end the update
LookUp('Tip 1 - Project Requests',ID=selectedRequest.ID).History
// This LookUp function ensures we get the most up-to date value in-case someone else made an update while you were typing.
)
Notify(
    "Comment posted to the issue",
    NotificationType.Information
);
// Adds a notification bar at the top of the screen notifying the update was successful
Set(selectedRequest,LookUp('Tip 1 - Project Requests',ID= selectedRequest.ID));
// Updates the selectedRequest variable to the latest value
UpdateContext({resetCommentBox: true})
// Will trigger the reset property of the comment box to clear the value that was typed originally.
At this point, we should now have something that looks relatively close to the following

Step 4 – Testing it Out
Now in order to test the functionality you can:
- Select a project request to “Review”
- See the History Header change to reflect that we selected that request
- Add a comment into the comment box
- Click “Add Comment” button
- Notice the History auto-update and the notification across the top saying that the comment was added
Conclusion
With this demo there is much more to show and expand upon that includes dynamically changing other fields as well using the Patch() function. In case you had trouble with your app along the way or just want to compare, you can download the PowerApp package from the site here. You will still have to create the SharePoint list with the schema outlined in the above steps to make the app work. Leave a comment below with any feedback or questions you may have and stay tuned for the next installment.
0 Comments